Hey dear reader 🖖, glad you've fallen in my article, hope it helps you!
In the past weeks, I've been doing research on how I could create and edit a Google Sheets spreadsheet from my Elixir project.
Before trying to reinvent the wheel, I searched for dependencies that would have already implemented the features needed. Unfortunately, I couldn't find any that would solve my problem.
Well, if there is none, I decided to implement the features from scratch: from implementing an OAuth2.0 access token client, to the creation of a Google Sheets spreadsheet!
Fasten your seat belt, this is going to be a long trip! 🛣️
Do you just want to search for a specific topic on this integration?
I got your back 😊. Here's a list of steps with every section of this article.
- Configure a new project on Google API Console ⚙️
- Create a new Google API Console project ✏️
- Choose the right APIs 👍
- Create OAuth credentials 🤫
- Add consent routing endpoint and the respective controller and view 🚦
- Test the new endpoint and create the OAuth credentials on the Google Console 🧩
- OAuth2.0 access token elixir integration 🔑
- Add application secrets 🤐
- Get access token logic and function 🤔
- Generating our access token 🧬
- Create a spreadsheet 🗒
- Google Sheets API requests 🤲
- How does the
create_spreadsheet function works?
- Well Bernardes, show me the example sheet!
- Google API x Elixir - Achievement unlocked 😂
Configure a new project on Google API Console ⚙️
The first thing we need to do, before hitting the code editor, is to create a project on the google developers console. If you want to use an existing project, make sure you have your project configured as I will show next.
Create a new Google API Console project ✏️
- When inside the console, click on Create Project, or, if you have any project on your account and this option doesn't appear, click on Select Project in the top left corner and then click on New Project on the top right corner.
 Click on Create Project button
- After that, choose the name that best describes your project! In the Project ID field I have actually made an insane amount of tries but all of them weren't allowed so I gave up and stayed with the one generated by the console. When you finish filling all the fields just click Create and voilá, the integration of elixir with Google API is done. I'm kidding 😂, we are not even half way there, but at least we have the Google Console project created! Kudos for that!
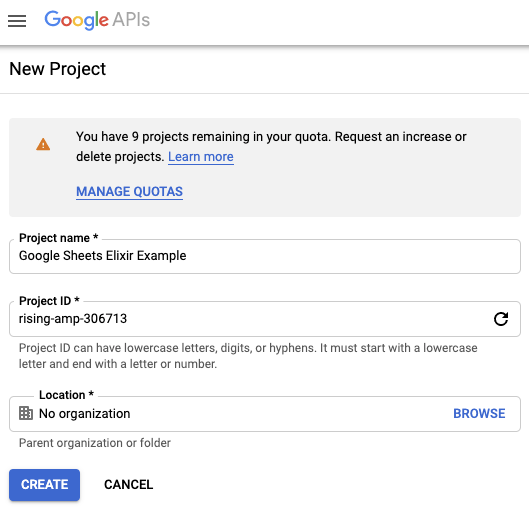 Fill all the fields before creating a project
Choose the right APIs 👍
When we are saying that we are integrating Google APIs with Elixir, that's not entirely true, because Google APIs as a ton of APIs (217 to be exact at the time of this article 😅).
What we are doing is giving you the basics (for example, the OAuth2.0 is shareable by more than one API) and an example of one API integration. This will give you the foundations to create an integration for almost every other Google API.
So, for our example project, we will use Google Drive API and Google Sheets API. In order to install both of them onto our project in the google console, first, check if you have the project selected. For that, check if the name of your project appears on the top left corner like this
 Select the correct project
If so, then click on Enable APIs and Services, search the names of the APIs (drive and sheets), click on the API, and press Enable
 Enabling a Google API into the project
Create OAuth credentials 🤫
First, we need to create an endpoint in our Elixir application to receive the code generated by the consent screen that will be presented the first time we use the API.
The endpoint created will be added on the redirect uri field of the OAuth credentials created on the Google Console.
Add consent routing endpoint and the respective controller and view 🚦
On our router.ex we will add this on the api scope.
scope "/api", GoogleSheetsWeb do
  pipe_through :api

  # Endpoint to receive google sheets consent to generate token
  get("/consent", ConsentController, :consent)
end
Then, we create the ConsentController to deal with the request. For now, we will inspect only the parameters and always return status 200, to test if everything is working correctly.
defmodule GoogleSheetsWeb.ConsentController do
  use GoogleSheetsWeb, :controller

  def consent(conn, params) do
    IO.inspect(params)

    conn
    |> put_status(200)
    |> render("consent.json")
  end
end
Actually, the response of this endpoint is not really that important because the user of the endpoint, which is the Google API, doesn't expect a response for the request.
We will mainly use the response of this endpoint for debug purposes. Either way, we need to create a view for the consent endpoint.
defmodule GoogleSheetsWeb.ConsentView do
  use GoogleSheetsWeb, :view

  def render("consent.json", _) do
    %{info: "Consent received with success!"}
  end
end
Test the new endpoint and create the OAuth credentials on the Google Console 🧩
To test if the endpoint is working properly, let's start the server and do a request to it.
In my case, I will call localhost:4000/api/consent?test=this_is_a_test_parameter and expect that the IO.inspect(params) prints the request parameters, and the status code 200 is returned with the message {"info": "Consent received with success!"}.
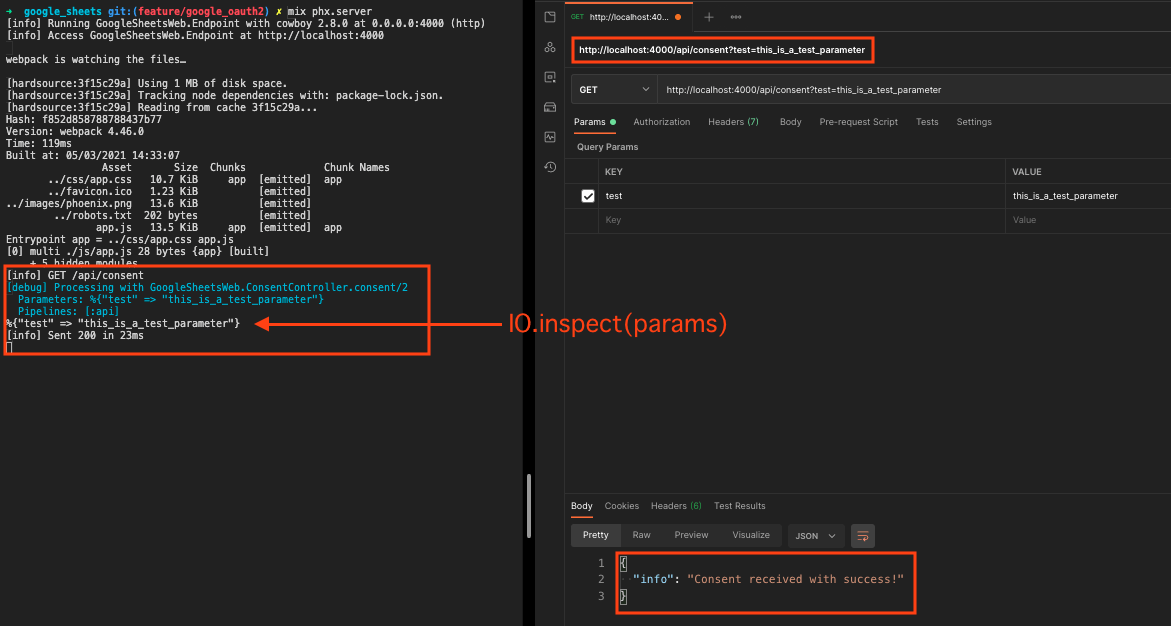 Check if our work until now is working correctly 😅
Having the endpoint created and properly working, let's go back to the Google Console and finish configuring the credentials.
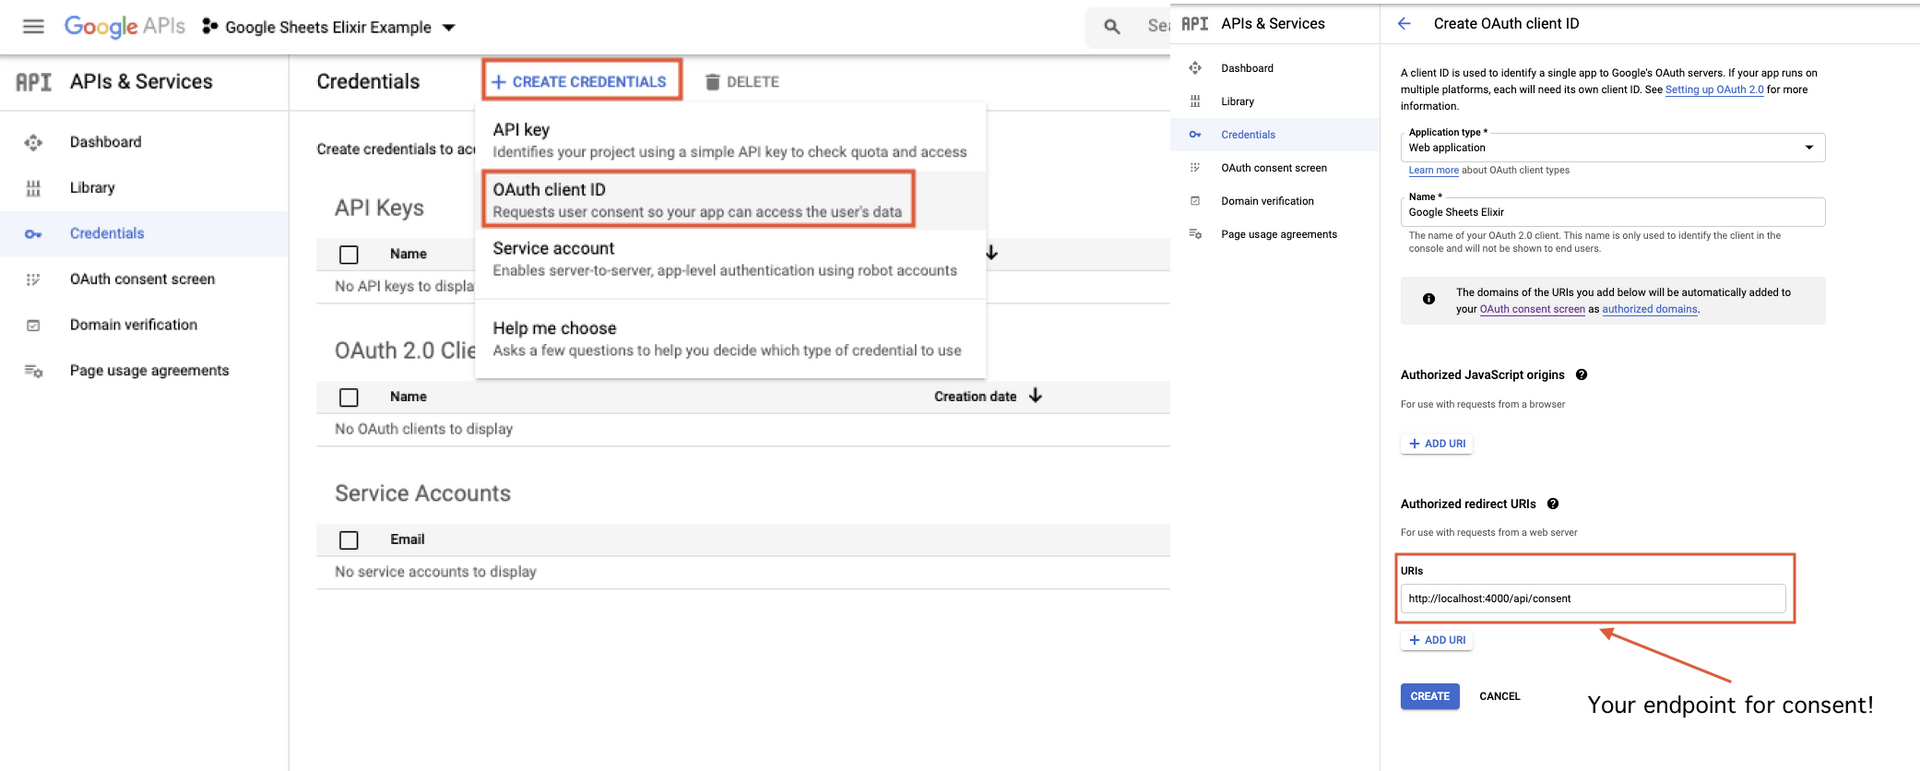 Add redirect uri to the google console project
After that, click Create and save both Your Client ID and Your Client Secret because we will need them later! By now, you can close all google console stuff.
Once more, kudos 👏! You completed with success all the configuration needed on the Google Console.
Now, it's time to jump into coding, we will now generate and save the access token for later use.
OAuth2.0 access token elixir integration 🔑
Now we will handle the authentication part of our application.
What we will do is generate a consent url that, when we allow a google account, a callback will be sent to the endpoint we previously defined with a code that, when using it to do another API request, will generate us three parameters
- access_token that is used to make all the google API calls.
- expires_in that informs how long does the current token lives.
- refresh_token is used to, when the current access_token expires, generate a new one.
Did this explanation got you even more confused? Here's a very simple diagram to help you understand.
Without further a do, let's get our hands dirty. 🔨
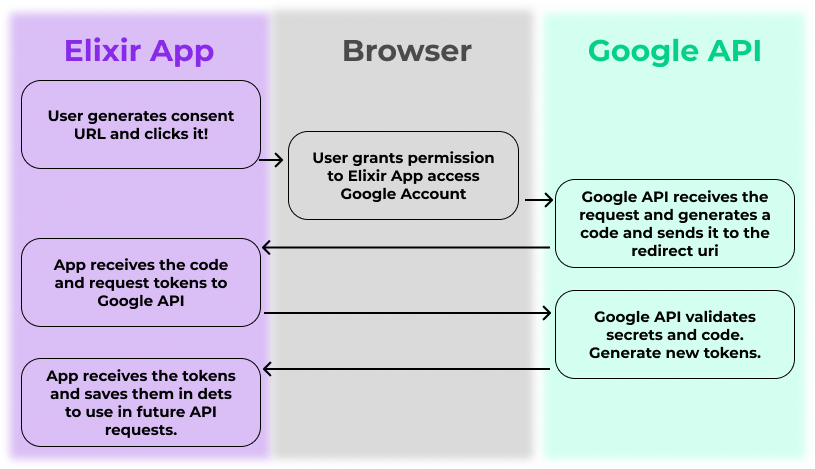 Flow from generating a consent url to create Google API tokens for API calls
Add application secrets 🤐
In the root of your project, create an environment file and add the following secrets.
export GOOGLE_CLIENT_ID=your_client_id
export GOOGLE_CLIENT_SECRET=your_client_secret
export GOOGLE_CONSENT_REDIRECT_URI=your_consent_endpoint
export GOOGLE_CLIENT_STATE=A key generated with "mix phx.gen.secret" (remove special chars)
In your config file add a new entry for this new google api secrets. After all of this don't forget to source the newly added secrets.
# Secrets to use Google Sheets
config :google_sheets, :api_secrets,
  client_id: System.get_env("GOOGLE_CLIENT_ID"),
  client_secret: System.get_env("GOOGLE_CLIENT_SECRET"),
  client_state: System.get_env("GOOGLE_CLIENT_STATE"),
  redirect_uri: System.get_env("GOOGLE_CONSENT_REDIRECT_URI")
Feel free to store / handle the secrets with other mechanisms other than the one presented.
Get access token logic and function 🤔
The logic of where to get the access token at which stage will be handle here. It will work as follows
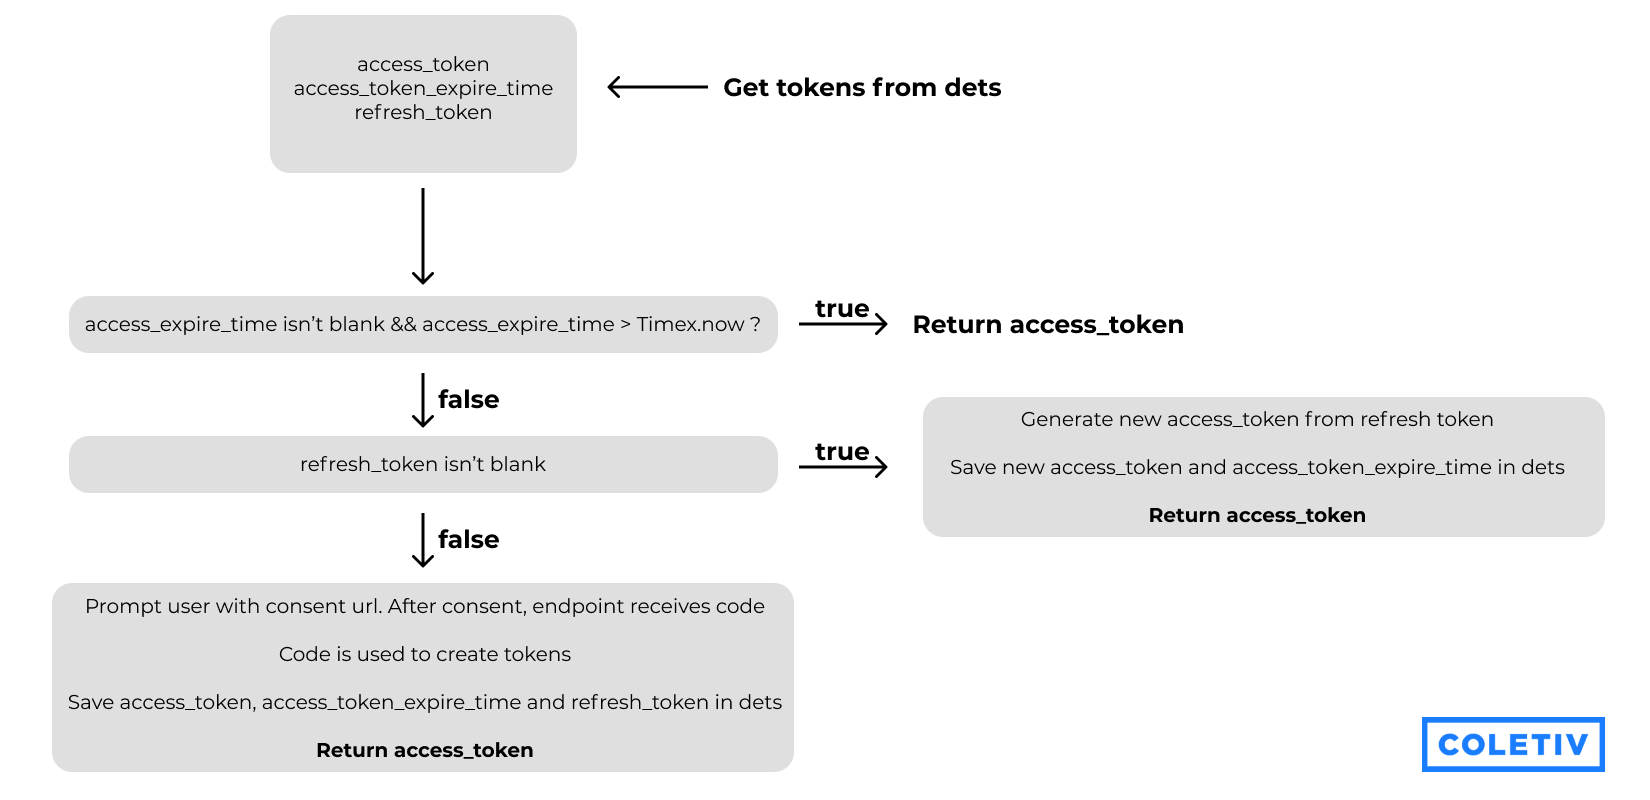 Get access to token logic
With some magic tricks 🧙♂️, we transform this logic map into the following elixir function (don't forget to add Timex, Poison, HTTPoison, and Blankable dependencies to the project).
def get_access_token do
  saved_tokens = Dets.get_google()

  with false <- Blankable.blank?(saved_tokens.access_expire_time),
       false <- Timex.now() > saved_tokens.access_expire_time,
       false <- Blankable.blank?(saved_tokens.access_token) do
    {:ok, "Bearer #{saved_tokens.access_token}"}
  else
    true ->
      case Blankable.blank?(saved_tokens.refresh_token) do
        false -> get_access_from_refresh_token(saved_tokens.refresh_token)
        true -> consent_error()
      end
  end
end
If you want to consult the auxiliary functions to this one, you can access the auth.ex on our example project. In that file, you can find the function save_tokens that will transform the code received from the callback in API call tokens.
By this time I've already changed our consent endpoint controller to the following code (don't forget to add the error view too 🙂).
def consent(conn, %{"code" => code, "state" => state}) do
  my_state = Application.get_env(:google_sheets, :api_secrets)[:client_state]
  with true <- state == my_state,
       {:ok, :token_saved} <- Auth.save_tokens(code) do
    conn
    |> put_status(200)
    |> render("consent.json")
  else
    _ ->
      conn
      |> put_status(404)
      |> render("error.json")
  end
end
If until now, you have any doubts or any code changes suggestions you can leave in the comments of the article or in the example project. I will be more than happy to help you! Don't be afraid of doing any question 😌.
Interested in knowing how I save the tokens in dets? You can consult the dets.ex on the example project.
To understand how Google API OAuth2.0 works in server-side web apps, I highly recommend consulting google api OAuth2.0 server-side documentation that is super clear. I did the authentication module following their docs!
Generating our access token 🧬
Before continuing, huge thanks to you for continuing with me on this journey, it's being a long journey but we are almost ending. Kudos to you 👏!
Now, after adding all the authentication code, it's time to see if we can generate with success the access token to do API requests.
The first time we run the function of get_access_token it will return us the following (if you're using environment variables as I've told previously, they will automatically be on the url).
{:error,
 %{
   message: "Consent google_sheets app to access google api.",
   url: "https://accounts.google.com/o/oauth2/v2/auth?client_id={YOUR_CLIENT_ID}&redirect_uri={YOUR_REDIRECT_URI}&response_type=code&scope=https://www.googleapis.com/auth/drive&state={YOUR_STATE}&access_type=offline"
 }}
Opening the link, we will be redirected to the consent page. If you are obtaining 'Error 403: access_denied' on the consent page you have to go to your project in the Google Console and in the OAuth Consent Screen tab add your email as a Test User.
After you do that, try opening again the consent url and connect with your email. It will prompt you to allow the application to access your Drive. Depending on the scopes you've added in the consent url it can appear you distinct permissions.
In my case, I added the scope https://www.googleapis.com/auth/drive that grants the highest permission possible.
After allowing everything prompted, you will be redirected to our elixir application endpoint that will receive the google api code and will generate the tokens used to do API calls. If our request was done with success, our endpoint should return
{ "info": "Consent received with success!" }
After this, if we go back and try to obtain the access token from the function get_access_token we get
iex(1)> GoogleSheets.Auth.get_access_token
{:ok, "Bearer ya29.[...]l4pkhcM"}
(For reference I'm running this commands with the server running in IEx mode. If you want to do the same just start the server with iex -S mix phx.server)
And with this, we conclude the Authentication process 🥳! I hope you haven't had too many difficulties so far.
Until here, you can use these methods for any type of integration (being Sheets, Docs, any other Google API that uses OAuth2.0 access token 😅) because the authentication method is always the same.
Once more, if you have any doubts, please feel free to write in the comments that I will be more than happy to help you. Ready for the funny part? 😊
Create a spreadsheet 🗒
To create a spreadsheet, we will need these three things:
- Create a spreadsheet (who knew 😂)
- Give access to an email to that spreadsheet
- Place content on the spreadsheet
For this, I will create two files. requests.ex will be responsible for doing Google Sheets API requests and builder.ex will be responsible for creating a spreadsheet content.
Google Sheets API requests 🤲
For our integration, we will create a sheet that, soon after the creation, read and write permissions are given to an email. For that, add a new environmental variable to the project configuration (and, of course, in your environment variables file).
config :google_sheets, :api_secrets,
  ...
  default_permission_email: System.get_env("DEFAULT_PERMISSION_EMAIL")
The function responsible for creating a spreadsheet is as follows
def create_spreadsheet(sheet_name) do
  with {:ok, access_token} <- Auth.get_access_token(),
       {:ok, %HTTPoison.Response{body: body, status_code: 200}} <-
         HTTPoison.post(
           build_url(:create_spreadsheet, nil),
           json(:create_spreadsheet, sheet_name),
           [
             @json_content_type,
             @json_accept,
             {"Authorization", "#{access_token}"}
           ]
         ),
       {:ok, %{"spreadsheetId" => spreadsheet_id}} <- Poison.decode(body),
       {:ok, :permissions_success} <- access_spreadsheet(access_token, spreadsheet_id) do
    {:ok, spreadsheet_id}
  end
end
How does the create_spreadsheet function works?
This function will create the spreadsheet with the content presented on the builder.ex and, if the sheet is created with success, we grant permissions to the email specified on the config secrets. You can find the other auxiliary functions on the example project.
The body of this create sheet request is a huge builder function that creates a map with the content of an Instance of Spreadsheet.
Once again, I highly recommend reading the documentation behind the spreadsheet instance. It will be a little tricky to understand at the beginning because it's a lot of nested maps and lists, but, once you try a bit and make some test sheets you will start understanding.
Nonetheless, if you want to check how I approached the body of the sheet check the builder.ex on the example project (I'm avoiding adding to the article since it's a lot of code).
In the end, I use the magic of Poison to encode the map with nested stuff into JSON.
defp json(:create_spreadsheet, project_name) do
  Builder.build(:create, project_name)
  |> Poison.encode!()
end
Well Bernardes, show me the example sheet!
Don't worry, the reward always comes at the end!
When we call the function create_spreadsheet we get...
iex(1)> GoogleSheets.Requests.create_spreadsheet("Test")
{:ok, "1GmjZqX[...]1SaQaoXe0"}
...and then, we go to the google drive of the default_permission_email and.... voilá!
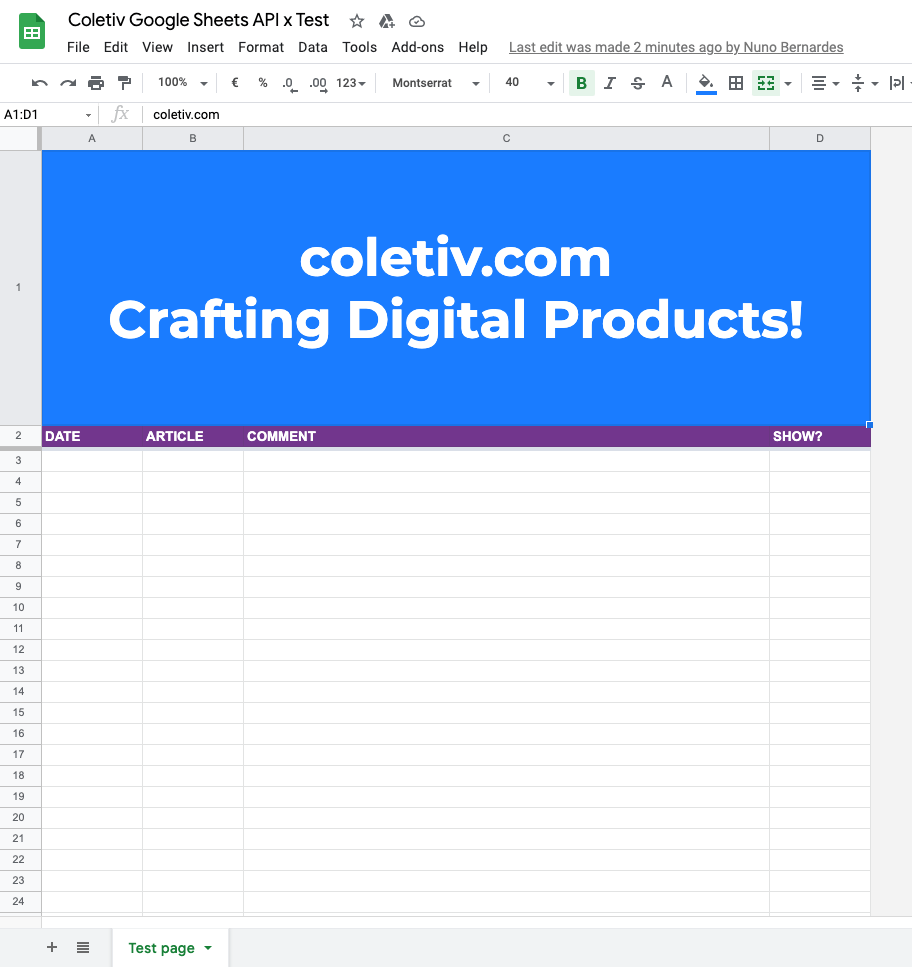 Results sheet
Google API x Elixir - Achievement unlocked 😂
We have just unlocked a number of possibilities together! It was a huge journey until here, I bet you're tired of scrolling, but at the same time with a little bit more knowledge about Google API and Elixir integrated with each other.
Hope I've shared with success what I have learned doing this amazing project. Once more, and I can't stop remembering, you can find the example project on Coletiv Github and if you have ANY questions don't be afraid to reach me in the comment section.
