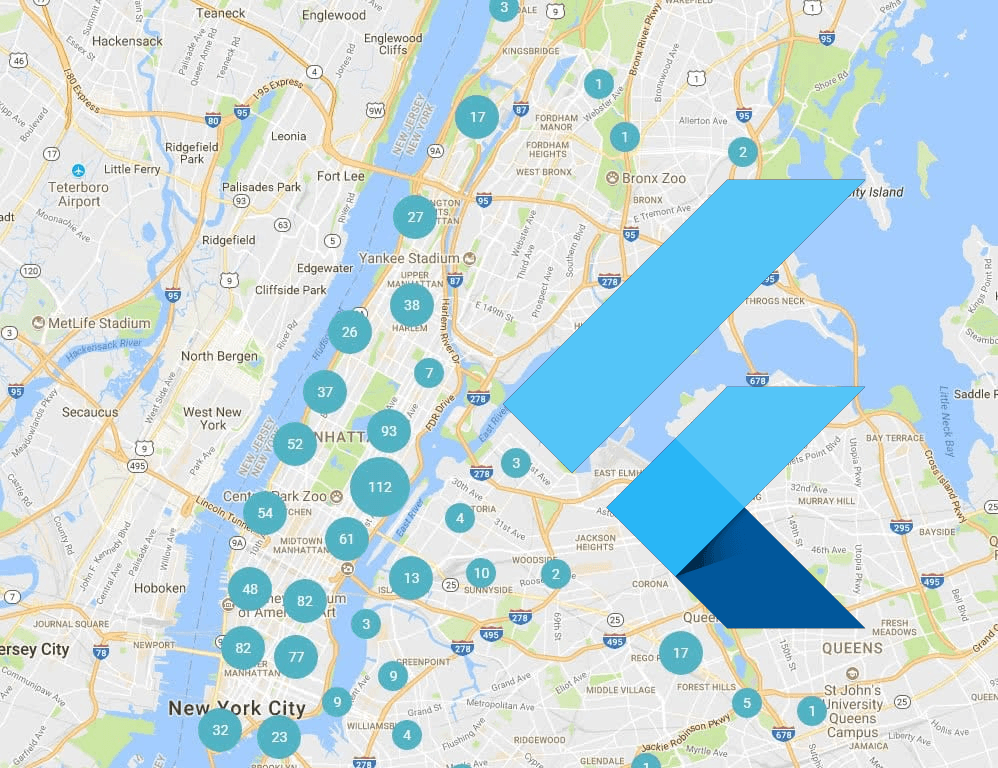
If you’re using Google Maps to display markers on your Flutter app, I’m sure that you will eventually need to cluster those markers. You don’t want users to zoom out and see hundreds of markers spamming the map right?
Well, as I’m sure you know by now, that feature isn’t supported yet by the official Google Maps package. Check this issue to know more.
Rest assured though because I’ve got a solution that might work for you.
 We have a solution for you!
Fluster Package Comes to the Rescue
In your search for solutions, you probably bumped into the Fluster package. This package uses a Dart port of supercluster and works really well, but how do you use it on your Flutter project?
The readme is very brief, doesn’t explain much and the example isn’t even a Flutter project. This makes the package very easy to overlook unless you find this demo project by the package author, but even with this code, you will struggle to understand how to use it in your project. At least I did. Again, there are no proper readme instructions and the code can be a bit overwhelming at first.
In this article, I will break down the code and explain it step by step so you can understand and implement a similar solution in your project.
Implementing Fluster
1. Extending the Clusterable class
Fluster can only handle markers that conform to the Clusterable abstract class so this is a good place to start.
import 'package:fluster/fluster.dart';
import 'package:google_maps_flutter/google_maps_flutter.dart';
import 'package:meta/meta.dart';

class MapMarker extends Clusterable {
   final String id;
   final LatLng position;
   final BitmapDescriptor icon;

MapMarker({
   @required this.id,
   @required this.position,
   @required this.icon,
   isCluster = false,
   clusterId,
   pointsSize,
   childMarkerId,
   }) : super(
         markerId: id,
         latitude: position.latitude,
         longitude: position.longitude,
         isCluster: isCluster,
         clusterId: clusterId,
         pointsSize: pointsSize,
         childMarkerId: childMarkerId,
      );

Marker toMarker() => Marker(
         markerId: MarkerId(id),
         position: LatLng(
         position.latitude,
         position.longitude,
         ),
         icon: icon,
      );
}
Here is my implementation. You can see it on Github here. Notice how I’ve added the toMarkert() method. This method will come in handy later on, to convert our list of MapMarkers to a list of Markers so our GoogleMap widget doesn’t complain.
Note that you can add more arguments to the class depending on your use case. Like an onTap() callback or a Marker InfoWindow.
2. Create the List of Markers to be Displayed
import 'package:flutter_google_maps_clusters/helpers/map_marker.dart';
import 'package:google_maps_flutter/google_maps_flutter.dart';

final List<MapMarker> markers = [];

final List<LatLng> markerLocations = [
   LatLng(41.147125, -8.611249),
   LatLng(41.145599, -8.610691),
   ...
];

for (LatLng markerLocation in _markerLocations) {
   markers.add(
      MapMarker(
         id: markerLocations.indexOf(markerLocation).toString(),
         position: markerLocation,
         icon: markerImage,
      ),
   );
}
You should have a list of locations where you want to place the markers. Create a MapMarker for every location.
3. Init Fluster
import 'package:fluster/fluster.dart';
import 'package:flutter_google_maps_clusters/helpers/map_marker.dart';

final Fluster<MapMarker> fluster = Fluster<MapMarker>(
   minZoom: minZoom, // The min zoom at clusters will show
   maxZoom: maxZoom, // The max zoom at clusters will show
   radius: 150, // Cluster radius in pixels
   extent: 2048, // Tile extent. Radius is calculated with it.
   nodeSize: 64, // Size of the KD-tree leaf node.
   points: markers, // The list of markers created before
   createCluster: ( // Create cluster marker
      BaseCluster cluster,
      double lng,
      double lat,
   ) => MapMarker(
         id: cluster.id.toString(),
         position: LatLng(lat, lng),
         icon: clusterImage,
         isCluster: cluster.isCluster,
         clusterId: cluster.id,
         pointsSize: cluster.pointsSize,
         childMarkerId: cluster.childMarkerId,
   ),
);
Here, you’re creating your Fluster instance. It will handle all the logic of updating the markers and clusters you need to show in your map for a given zoom level. For more information about the parameters used, check out the Fluster source code or the supercluster options.
4. Get Cluster Markers
import 'package:fluster/fluster.dart';
import 'package:flutter_google_maps_clusters/helpers/map_marker.dart';
import 'package:google_maps_flutter/google_maps_flutter.dart';

final List<Marker> googleMarkers = fluster
      .clusters([-180, -85, 180, 85], currentZoom)
      .map((cluster) => cluster.toMarker())
      .toList()
Now you’ll see that handy toMarker() method coming to action. We’re telling fluster to get the cluster markers within the giving bounding box of [westLng, southLat, eastLng, northLat] for the current zoom level and converting them to Google Maps Markers. Now we can use that list to show the markers on the map.
5. Show the Map with Markers
import 'package:flutter/material.dart';
import 'package:google_maps_flutter/google_maps_flutter.dart';

@override
Widget build(BuildContext context) {
   return Scaffold(
      body: GoogleMap(
         initialCameraPosition: CameraPosition(
            target: LatLng(41.143029, -8.611274),
            zoom: currentZoom,
         ),
         markers: googleMarkers.toSet(),
         onMapCreated: (controller) {
            // You can init Fluster here
         },
         onCameraMove: (position) {
            // Update the markers for the updated position.zoom
         ),
      ),
   );
}
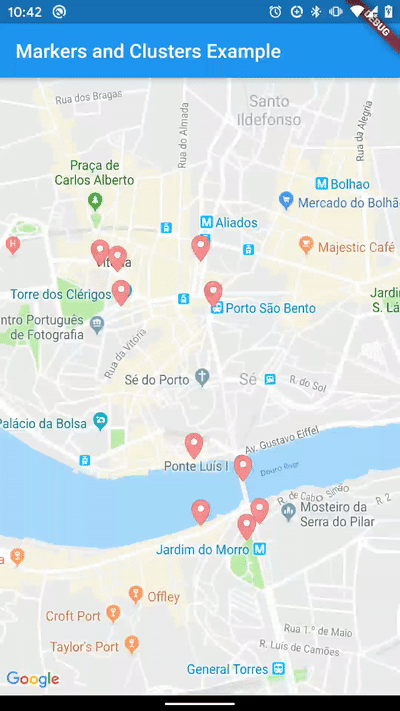
In the build(context) method of your page, you should create your Google Map widget and pass the markers created by fluster and voilà! You will have clusters showing in your map. 👏 👏 👏
You can use the onMapCreated() to know when the map is ready to show your markers. Also, make sure to update the markers with the updated zoom level on the onCameraMove() by calling setState() or using your favorite state management system, so Fluster knows if it needs to cluster or uncluster some markers.
 Marker Clustering Working on Google Maps
Now you have all the code needed to implement marker clustering on your GoogleMap widget. Hope you‘ve found this article useful and understood how everything works.
Be sure to check the example project at the Coletiv Github account to see the rest of the code needed to implement clusters on Google Maps.
Don’t forget to add your Google Maps API key to the project if you want to see it working. Just add it here and here.
Also, if you want to try some alternatives to handle marker clusters check out Flutter Map and Flutter Map Marker Cluster packages.