This is the second article of a 2-part series, where we explain in full how to automate your Elixir project’s deployment. The technologies used are AWS, to host your project, and CircleCI, to automate the testing and deployment of the application.
Part 1 — How to automate your Elixir project’s deployment into AWS
Part 2 — How to automate the deployment of your Elixir project with CircleCI
Continuous… Integration? Delivery? Deployment?
Before we start to explain any of the steps we are going to take, there is a need to define exactly what we want to achieve with this tutorial, so let’s set the stage.
-
1 - You have an Elixir application on Github or any other Git platform, with branches for the features, but more importantly, branches dedicated to the the staging and production environments.
-
2 - You have the necessary infrastructure which you want to deploy the code to — check the previous article to know how to configure AWS. This should make your application accessible to testers (staging) and to customers (production).
At Coletiv, we try to automate the workflow of our projects up to a certain point. We like to automate the tests, as well as the deployment to the staging environment — Continuous Delivery — but we prefer to do the production deployment manually.
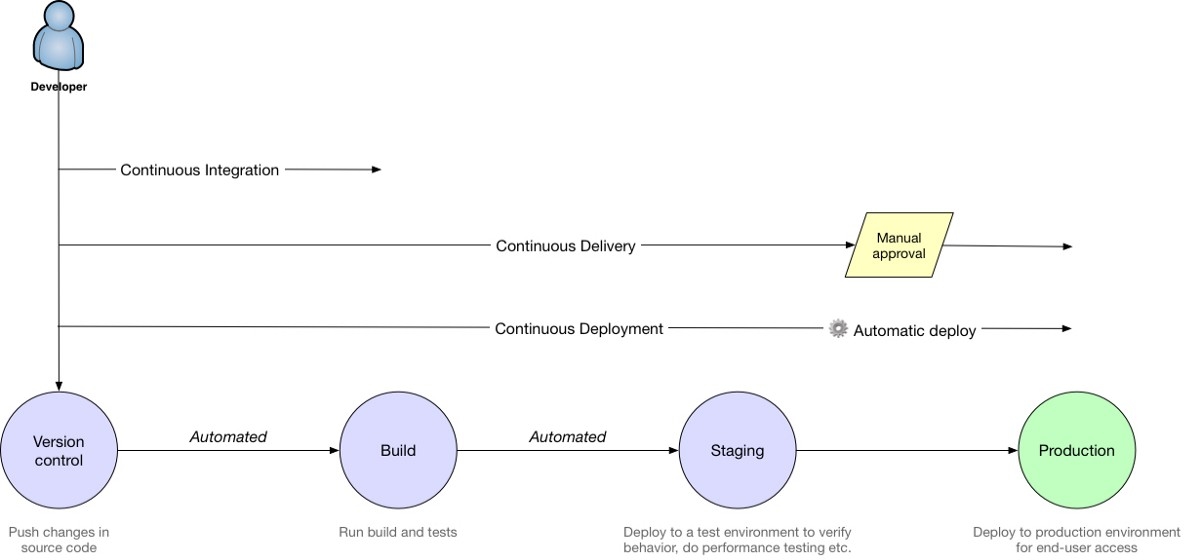 Continuous Integration vs Continuous Delivery vs Continuous Deployment. Source
This tutorial describes the deployment in this optic, but you can as easily change the steps to adapt your needs. You can achieve Continuous Deployment by taking the steps that automate the staging environment and applying them to the production environment.
A) Preparing Your App for Deployment!
So, where to start? You will be executing these steps on your own machine, where you have a local version of some feature branch of your project that you want to deploy. These are crucial configurations that only have to be done the first time.
1. Adding New Elixir Dependencies for Release
There are 2 new depedencies that make deploying elixir/phoenix projects a lot easier. These are edeliver and distillery. While distillery produces a release out of your mix project, edeliver deploys the release to your specified environment.
First, go to the mix.exs file and add them to the dependencies. Also add edeliver to the applications, just as follows:
def application, do: [
  applications: [
      ...
    # Add edeliver to the END of the list
    :edeliver
  ]
]

defp deps do
  [
    ...
    {:edeliver, "~> 1.6.0"},
    {:distillery, "~> 2.0", warn_missing: false},
  ]
end
2. Configuring Distillery
Next, you will be writing some additional configurations, for these dependencies to work correctly with the infrastructure you prepared.
Distillery has a nice command that prepares a new project for releases. Try running it:
mix release.init
It should create a folder named rel in the project root, with a config.exs file inside of it. Navigate to this file, find the line that sets the applications and replace it with the following:
applications: [
  :your_app,
  :edeliver
]
3. Configuring Edeliver
Create a folder named .deliver in your project root, if it does not yet exist. Inside of it, create a file named config (no extension). If you followed the previous tutorial), about AWS, the contents you have to put into your config file should be something like this:
APP="your_app_name"

BUILD_HOST="your_aws_ec2_staging_machine_ip"
BUILD_USER="ubuntu"
BUILD_AT="/opt/your_app_name/builds"

STAGING_HOSTS="your_aws_ec2_staging_machine_ip"
STAGING_USER="ubuntu"
DELIVER_TO="/opt/your_app_name/api"

# For *Phoenix* projects, symlink prod.secret.exs to our tmp source
pre_erlang_get_and_update_deps() {
  local _prod_secret_path="/opt/your_app_name/prod.secret.exs"
  if [ "$TARGET_MIX_ENV" = "prod" ]; then
    __sync_remote "
      ln -sfn '$_prod_secret_path' '$BUILD_AT/config/prod.secret.exs'
    "
  fi
}
Do not forget to actually replace ”your_app_name” and ”your_aws_ec2_staging_machine_ip” with the actual values (leave the quote marks untouched).
This is the file that configures WHERE your code will be deployed to, anytime we merge a new feature to the staging or production environments. We usually leave the staging IP by default, so that CircleCI will use it for the deployment to the staging machine.
For now, we are automating staging only, so you can leave the file with the staging machine’s IP. If you wanted to actually do a direct deployment for production, you would need to make the following changes:
The next deployment to be triggered, either manually or not, would use that IP.
Tip: You might want to add the folder .deliver/releases to .gitignore.
echo ".deliver/releases/" >> .gitignore
4. The Deployment Scripts
We created 2 deployment scripts: deploy.sh for staging and prod_deploy.sh for production. Go to the project root, create a folder named scripts and inside of it, create the files for these scripts.
deploy.sh
#!/bin/bash
if [ $? -eq 0 ]; then
  echo "CI Branch: $CI_BRANCH"
  echo "CI Pull Request: $CI_PULL_REQUEST"
  DEPLOY_BRANCH="develop"

  if [ "$CI_BRANCH" == "$DEPLOY_BRANCH" ] && [ "$CI_PULL_REQUEST" == "false" ]; then
    # Hot swap need to know what is the current version
    echo " :: Edeliver: Build"

    #mix edeliver build upgrade
    mix edeliver build release --branch=$DEPLOY_BRANCH

    if [ $? -eq 0 ]; then
      echo " :: [INFO] Successfully created build file!"

      echo " :: Edeliver: Deploy"
      #mix edeliver deploy upgrade
      mix edeliver deploy release --start-deploy --branch=$DEPLOY_BRANCH

      echo " :: Edeliver: Migrate"
      mix edeliver migrate --branch=$DEPLOY_BRANCH

      exit 0
    else
      echo " :: [ERROR] Could not create file"
      exit 1
    fi
  fi
else
  echo "Failed build!"
  exit 1
fi
prod_deploy.sh
GIT_REVISION_HASH=$(git rev-parse HEAD)
GIT_USER=$(git config user.name) # Get username from your console

function migrate_start () {
  echo " :: Migrate PRODUCTION database"
  mix edeliver start production


  if [ $? -eq 0 ]; then
    echo " :: Start PRODUCTION server"
    mix edeliver migrate production

    if [ $? -eq 0 ]; then
      echo " :: Production deployed and started!"
    else
      echo "[ERROR] :: Migrating!"
    fi

  else
    echo "[ERROR] :: Starting!"
  fi
}


# Check info before release
echo " --- Production Information --- "
mix edeliver ping production
mix edeliver version production

echo " Do you want to continue with the deploy [Y/n] ?"
read response

if [ "$response" == "Y" ]; then

  echo "Do you want to upgrade current version [upgrade] or create a new release [release] ?"
  read deploy_type

  if [ "$deploy_type" == "upgrade" ]; then

    echo "Current version in PROD: "
    read current_version

    echo "NEW version to deploy to PROD:"
    read new_version

    # Crease a release
    echo " :: Building upgrade ... "

    # UPGRADE
    mix edeliver build upgrade --from=${current_version} --to=${new_version}

    if [ $? -eq 0 ]; then

      mix edeliver deploy upgrade to production

      if [ $? -eq 0 ]; then
        migrate_start

      else
        echo "[ERROR] :: Deploying!"
      fi

    else
      echo "[ERROR] :: Building!"
    fi

  elif [ "$deploy_type" == "release" ]; then
    mix edeliver build release

    if [ $? -eq 0 ]; then
      mix edeliver deploy release to production

      if [ $? -eq 0 ]; then
        mix edeliver stop production
        migrate_start

      else
        echo "[ERROR] :: Deploying!"
      fi
    else
      echo "[ERROR] :: Building!"
    fi

  else
    echo "[ERROR] :: Invalid deploy type! [${deploy_type}]"
  fi

else
  echo "[ABORT] :: Deploy abort by user!"
fi
These scripts have all the necessary steps to build and deploy the project according to the previous configurations.
5. Creating the Configuration for Secret Credentials — prod.secret.exs
We might already have everything we need to manually deploy a project, but one important detail is missing. Some of the configurations for your application, such as the database credentials, should not be stored in the code you commit …
Instead, you should store all the sensible data in a separate file, which will be manually placed on the staging/prod machines. The configurations written in this file have the same syntax as a normal config file from your project. For instance, if you have a database you want to access with secret credentials, you should include the configuration for it in this new file:
use Mix.Config
# Configure your database
config :app_name, AppName.Repo,
  database: "database_name",
  username: "username",
  password: "my_password",
  hostname: "host_name"
Let’s create this file and call it prod.secret.exs. SSH into your staging/prod machines, navigate to the folder /opt/you_app_name and create the file there, or move it from your own local machine.
Feel free to add any other dependency configurations from your project to the file, especially if they include secret credentials or keys!
5. Endpoint Configurations on prod.secret.exs
Next, the prod.secret.exs file needs some extra configurations, if you want to be able to access the projects endpoints remotely.
# Configures the endpoint
config :<your_app_name>, <YourAppNameWeb>.Endpoint,
  secret_key_base: "<the_key>",
  http: [port: <your_nginx_port>],
  load_from_system_env: false

config :your_app_name, <YourAppNameWeb>.Endpoint,
  server: true,
  check_origin: false,
  debug_errors: true

# CORS
config :cors_plug,
  origin: [
    "http://localhost:3000",
    "http://staging.your_app.app"],
  max_age: 86400,
  methods: ["GET", "POST", "PUT", "DELETE", "PATCH"]
Replace <your_app_name> by the name of your app and <YourAppNameWeb> by the name of the Web module of your app. Next, replace <your_nginx_port> by the port you might have configured in the AWS tutorial. By default, it should be 4000, so you can try that.
Now, run the command:
mix phx.gen.secret
Replace <the_key> with the result from this command.
Finally, you only need to configure the CORS dependency. If your project has API routes, CORS will enable client applications to call this API.
Therefore, replace the origin links with whatever domains are going to be calling/accessing your API. Additionaly, add the CORS dependency locally, on your project’s mix.exs file:
# CORS
{:cors_plug, “~> 1.5”}
Do not forget to adapt the contents of the file to the environment of the machine. For instance, if the staging and production machines use different databases, then the prod.secret.exs file in both machines should differ in that configuration!
Now, you only need to import the secret file to your project. Go to your local config/prod.exs file and add the following line to the END of the file:
import_config "prod.secret.exs"
Voilá! You now have your secret credentials safely stored in the machines and your project knows how to access them!
7. Running the First Deployment to Staging
The first ever deployment to staging is manual, in order to populate the machines with the project’s code.
In your local machine, open the console, navigate to the project folder, checkout to the develop branch of your project and run the following:
export CI_BRANCH=develop
export CI_PULL_REQUEST=false
scripts/deploy.sh
This will prompt a manual deployment to the machine whose IP is on the .deliver/config file, so make sure that you have the correct staging IP and project details in that file. Now, just wait for the deployment to finish…
Congratulations! The first deployment was finished.
A few very important details to take into account before any deployment:
Tip 1: Always change the .deliver/config file to reflect the environment you are deploying to (e.g.: change the IP to the production machine IP)
Tip 2: Change the project version in mix.exs so you can later check if the deployment was successful
Tip 3: Update prod.secrets.exs if necessary
B) Setting up CircleCI for Continuous Delivery!
It is now time to automate the testing and deployment processes, if we want to achieve Continuous Delivery.
The objective is that, whenever a Pull Request from a feature to the staging branch is made, the code is tested and then deployed when the Pull Request is accepted. For this end, we will be using CircleCI.
1. Create a Context for your Project
In your project, you probably use some environment variables. Some of them are more secret, some are not as much. In your local machine you might place them in a .env file (which normally is is local and uncommited). In the staging/prod machines, you place these in the prod.secret.exs file.
But what about CircleCI? It does not have access to your machine’s prod.secret.exs nor your local .env file! This means you need to provide it with the variables yourself, and this is what Contexts are for.
Navigate to the Settings tab, choose the Contexts option and then Create Context.
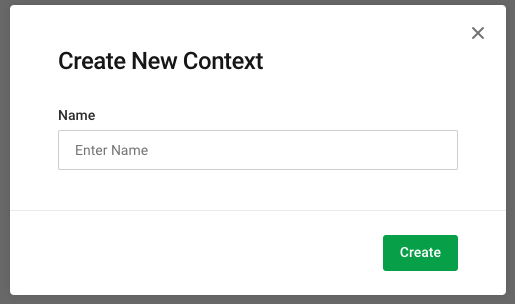 Create new context on circleCI
Access the context you just created and add any environment variables CircleCI might need to run your project, like database passwords and other sensitive application configurations (like the ones on the prod.secrets.exs file).
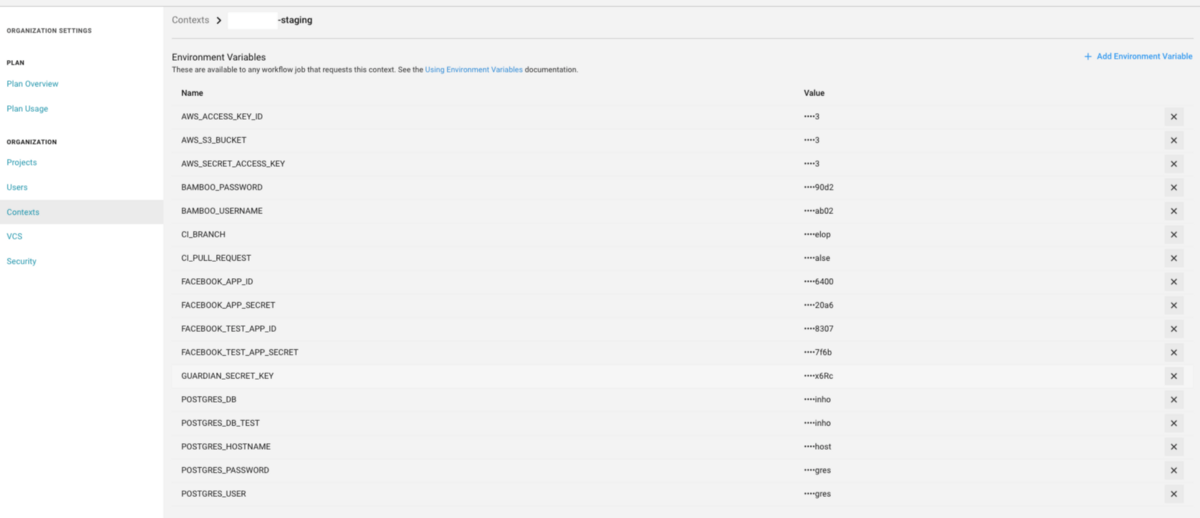 Add environment variables on circleCI
You may also add 2 important variables that were previously mentioned.
Name: CI_BRANCH  Value: develop
Name: CI_PULL_REQUEST  Value: false
2. Adding the Project to CircleCI
Login to CircleCI with the Github account you have access to the project with. On the left menu, navigate to the “Add Projects” tab and choose your project from the list.
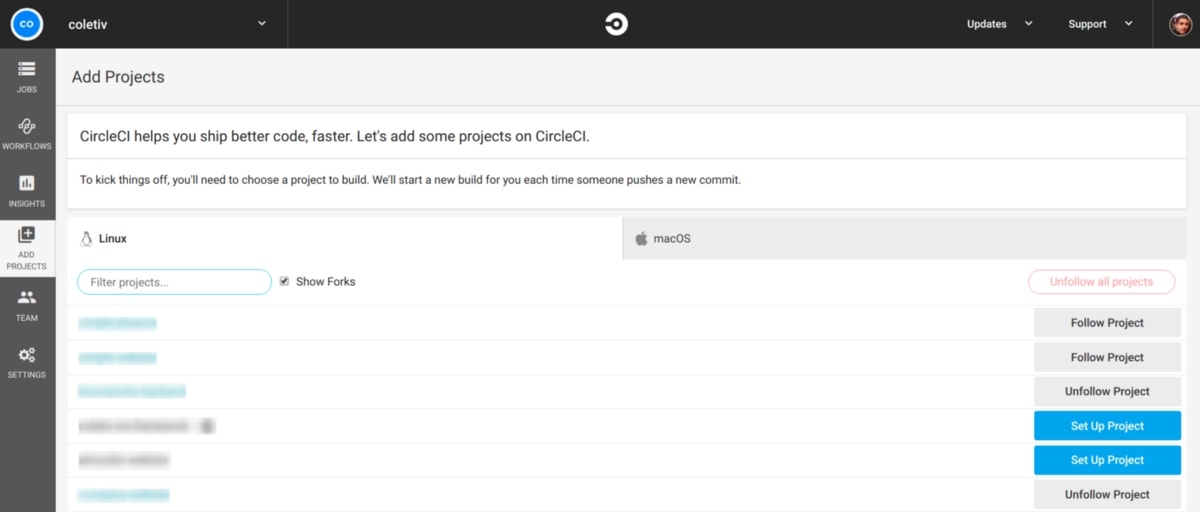 Add Project on circleCI
This will open a page with a set of instructions. For Elixir, the instructions are as follows:
2.1 On your project folder, create a folder named .circleci and inside of it, a file named config.yml.
2.2 Copy the following contents to the file you just created:
# .circleci/config.yml
defaults: &defaults
  parallelism: 1 # run only one instance of this job in parallel

  working_directory: ~/app # directory where steps will run

  docker: # run the steps with Docker
    - image: circleci/elixir:1.7.3 # ...with this image as the primary container; this is where all `steps` will run
      environment: # environment variables for primary container
        MIX_ENV: test
    # database image
    - image: circleci/postgres:10.4-alpine-postgis-ram

version: 2 # use CircleCI 2.0 instead of CircleCI Classic
jobs: # basic units of work in a run
  test:
    <<: *defaults
    steps: # commands that comprise the `build` job
      - checkout # check out source code to working directory

      - run: mix local.hex --force # install Hex locally (without prompt)
      - run: mix local.rebar --force # fetch a copy of rebar (without prompt)

      - restore_cache: # restores saved mix cache for the deps folder
          keys: # list of cache keys, in decreasing specificity
            - v1-mix-cache-{{ checksum "mix.lock" }}
            - v1-mix-cache-{{ .Branch }}
            - v1-mix-cache
      - restore_cache: # restores saved build cache
          keys:
            - v1-build-cache-{{ .Branch }}
            - v1-build-cache

      - run: # special utility that stalls main process until DB is ready
          name: Wait for DB
          command: dockerize -wait tcp://localhost:5432 -timeout 1m

      - run: mix do deps.get, compile # get updated dependencies & compile them

      - save_cache: # generate and store cache so `restore_cache` works for the deps folder
          key: v1-mix-cache-{{ checksum "mix.lock" }}
          paths: 'deps'

      - save_cache: # make another less specific cache
          key: v1-mix-cache-{{ .Branch }}
          paths: 'deps'

      - save_cache: # you should really save one more cache just in case
          key: v1-mix-cache
          paths: 'deps'

      - save_cache: # don't forget to save a *build* cache, too
          key: v1-build-cache-{{ .Branch }}
          paths: '_build'

      - save_cache: # and one more build cache for good measure
          key: v1-build-cache
          paths: '_build'

      - run: mix ecto.create
      - run: mix ecto.migrate
      - run: mix test # run all tests in project

  deploy:
    <<: *defaults
    steps:
      - checkout # check out source code to working directory
      - run: mix local.hex --force # install Hex locally (without prompt)
      - run: mix local.rebar --force # fetch a copy of rebar (without prompt)
      - run: mix do deps.get, compile # get updated dependencies & compile them
      # TODO: we should only run this steps on merge, right now we do the check on the script itself which does not prevent the checkout and all the other run steps to occur
      - run:
          name: Deploy if tests pass and branch is develop
          command: bash scripts/deploy.sh

workflows:
  version: 2
  build-test-and-deploy-staging:
    jobs:
      - test:
          context: your-app-context
      - deploy:
          context: your-app-context
          requires:
            - test
2.3 Update the contents of the file to reflect your own projects details.
For instance, you may change lines 83 and 85 to the name of the context that you created in the previous step.
 Context changes on circleCI config
In lines 7 to 12, check the versions of the software you are using and change them accordingly.

2.4 Push this change to GitHub
2.5 Return to the page with the set of instructions in CircleCI and press the “Start Building” button.
3. Giving CircleCI the permissions to access the Staging machine
The previous steps might all be correct, but without the private key to the staging machine, CircleCI still can’t finish the deployment.
Navigate to the project you just added, enter the settings and on the left bar, find the SSH Permissions. Next, press Add SSH Key, and you will be prompted with the following window.
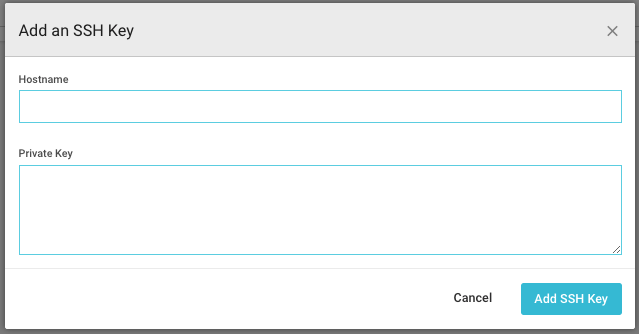 Add ssh key to circleCI
Simply add as hostname the IP to the staging machine and copy the private key (which you should have, if you followed the AWS tutorial). And this is it!
You’re done with setting up CircleCI! Your code should now run the tests and deployment automatically, as expected.
C) Creating a Release and Deploying to Production
The following steps describe how to manually create a release on Github and how to deploy a release to the production servers.
-
1 - Create a Pull Request from your Staging branch to Master, accept and merge it.
-
2 - Create a release on Github based on your master branch — remember the version tag, you will use it later.
-
3 - Get the code on your local machine, compile and test it.
checkout master
git pull
mix deps.get
mix compile
mix test
-
4 - Edit the .deliver/config file. First, change all the IPs to the IP of the production machine. Then, replace STAGING_HOSTS with PRODUCTION_HOSTS and STAGING_USER with PRODUCTION_USER.
-
5 - On the project folder, run the production deployment script.
scripts/prod_deploy.sh
-
6 - When you are prompted with the question “Release or update?”, choose “Release”.
-
7 - When asked about the release version, choose the one corresponding to the latest version on your mix.exs file. This should also be the version that you used on the tag of your github release.
-
8 - Wait for the deployment to finish
-
9 - You are done!
This wraps up our tutorial, as your deployment to production was probably successful at this stage! We leave you with some extra tips below.
Tip 1: Whenever doing future features, do not forget to check that the .deliver/config file has the IP for staging correctly configured. Also check that the file has a STAGING_HOSTS and STAGING_USER field when deploying to staging and PRODUCTION_HOSTS and PRODUCTION_USER when deploying to production!
Tip 2: To check if the deployment was successful, maybe consider adding an /api/info route to your project, which prints the version of the application.
Tip 3: You may use all of the previously provided scripts and try to alter them to fit your needs or even automate your deployment to production
